woensdag 12 juni 2013

Recap & Pipeline

The results from the tests and research done during  this period have lead to a final set up and a supposition as to how to best approach the creation pipeline for the production stage. This will be given in a short recap here below.

The first step is to model the human form character mesh in Maya. From this mesh create the bipedal and quadruped forms without changing the topology, by adding edges or vertices. This way the vertex order is not affected.

When the meshes are created test if the blend shapes are working for each model before initialize the sculpting phase. Also add additional meshes like tail, teeth, eyes, fur patch geometry and claws and make sure they are placed correctly so they do not create holes later on in the animation phase. Then sculpt each of the three forms in either Zbrush or Mudbox.

Once sculpting is done create the separate UV layouts for all three character meshes. Make sure that the UV’s for each character mesh is laid out on top of one another. Paint the textures and bake the normal maps from the sculpted models. Bake additional normal maps from the target meshes on the main meshes. This is the bipedal werewolf form baked on the UV layout of the human form and the quadruped werewolf form baked on the UV layout of the bipedal werewolf form. When baking these normal maps make sure that the main mesh has fully blended into the target mesh form.

The next step is to build out the rig structures for all three character meshes, with additional helpers for animation. Before skinning do delete the blend shapes that have been applied earlier. The blend shapes will be re applied in a later stage. Then skin each model to each rig and test the skin in UDK to see if it works. Create the animations for each character model.

To make the morph target, a posed model of the main mesh and a posed model of the target mesh need to be duplicated and a blend shape needs to be applied to these meshes. Once the blend shape is applied skin the duplicate of the main mesh in pose to the main mesh rig, a simple smooth bind in Maya should suffice.

Prepare the Root joint hierarchy and the models for exporting in UDK. Make sure to select the character mesh and all additional meshes with the root joint to export it in FBX with the checkboxes checked like below.


 Pipeline UDK:

The next step is to import the FBX into UDK. Make sure the imported file is a Skeletal Mesh. Also check on the checkboxes for ‘Import Morph Targets’ and ‘Import Animation’ under the tab Skeletal Mesh.
While importing one can place the models in a certain package, define it in a certain group and even change the name for the model.

Keep in mind that UDK will make one mesh out of multiple meshes when importing. When everything is done right one should have an AnimSet, a Morph Target and one Skeletal Mesh in your designated package.
Once everything has been imported check if the animation and morph targets work properly on the character meshes within the AnimSet.

The next step is to create the Material set up for the texture blending. This is done together with the Scalar Parameter Node, the Fresnel Node and the Add & Multiply Nodes. Make sure to use the baked normal map of the target mesh for the texture blending.


1.)     Colour map Human Form: The diffuse texture map from the human form character mesh.
2.)     Fresnel Node: A node which can replicate rim light on a texture, in this set up the Fresnel is used to make the transition of the blending possible.
3.)     Vector Parameter Node: A node to add additional colour to the emissive map and blending of the Fresnel. To make the transition in colour look more natural when blending
4.)     Emissive map Human Form: Emissive map. It can also be a different gray-scale map, which is used as an underlay for the colour map of the bipedal werewolf form.
5.)     Colour map Bipedal Werewolf Form: The diffuse texture map from the bipedal werewolf form character mesh.
6.)     OneMinus Node: A node used to show the visibility of the Scalar Parameter Node and give the 0 to 1 control for Kismet.
7.)     Scalar Parameter Node: The node that links to the controller in Kismet to animate the blending.

The textures for the additional meshes on the characters will either be added in the Materials for the character meshes or given their own Material(s) with the same texture blending node set up.

The result of this material set up gives one the opportunity to animate the texture blending in  Kismet. The image below shows a small breakdown of a matinee sequence used within the main sequence in Kismet.

1.)     Vector Material Parameter Track: A track to animate materials. To add key frames press enter on the timeline.
2.)     The Target Material: This is the Material for the track to use.
3.)     Parameter Name: The name of the controller in the Material. This is the name given to the Scalar Parameter Node in the Material
4.)     Track Values: These are the track values from the Vector Material Parameter Track. Setting these on zero and one on key frames in the animation bar makes the blending work.

___

Once all the materials, for all three character meshes have been created they have to be added to the character in each character AnimSet. It is also possible to add the Materials to the skeletal meshes later on once they have been placed in the scene.


Next up are the AnimTree’s, five in total will be created. Three AnimTree’s containing the animations for each character mesh; human form, bipedal werewolf form & quadruped werewolf form.
And two AnimTree’s containing the morph targets from human to bipedal werewolf form and from bipedal to quadruped werewolf form.

After these AnimTree’s have been create the scene can be set up. One needs to place five SkeletalMeshes as Actors in the scene. One human form SkeletalMeshActor, one bipedal werewolf form and one quadruped werewolf form. These SkeletalMeshActors will play the animations of the character mesh.

The other two are SkeletalMeshMATActors, one human form in pose and one bipedal werewolf form in pose. These Actors will play the Morph Targets.

Make sure to add all the AnimSets, AnimTrees and MorphSets to the right actor. This is done by right clicking on the mesh and opening its properties.


To make all the animations and transformations work, all the timers and sequences need to be set in UDK Kismet. Create three matinee sequences each containing skeletal groups for each character mesh. These Skeletal Groups will contain the animations, texture blending and morph targets.


        1.)     Morph Weight: A track to animate morph targets. To add key frames press enter on the timeline.
2.)     Morph Node Name: This is the Morph for the track to use. This is the name given on the MorphNodeWeight in the AnimTree.
1.)     Morph Weight Track Values: These are the track values from the Morph Weight Track. Setting these on zero and one on key frames in the animation bar makes the morph work.
3.)     Anim Control Track: A track to animate AnimSet animations. To add key frames press enter on the timeline.
4.)     Anim Control Slot Name: This is the Animation for the track to use. This is the name given on the AnimNodeSlot in the AnimTree.
2.)     Anim Control Track Values: These are the track values from the Anim Control Track. Setting these on zero and one on key frames in the animation bar makes the morph work.


Once these are set the nodes in Kismet need to be added and connected. Set Key/ Button Pressed nodes to make the animation and morph play when a certain key is pressed. And add Toggle Hidden nodes to hide and unhide certain models at certain times. Make the connections, test the sequence and the real-time transformation animation should work.

vrijdag 31 mei 2013

Model Animations in Maya and UDK

Right, showing the actual result I mentioned in my earlier post, "Model Animations _ stretching problem and solution", took a little longer then anticipated. This was due to some other work I had to do and things I wanted to test out with the blends and animations in Maya as well.

Here below is a video of the animation on the block-out character in Maya. This video shows what the transformation animation should look like. The transformation is from Human form to Bipedal werewolf form.


In Maya the animation fluid, the reason for this is because I re-applied the blendshape on the human form and set keys for the blendshape in the animation bar.
Unfortunately I cannot export the models with this method in the .FBX export. Why? Because the export does not allow the set up of applying a blendshape after the model has been skinned to the rig. For some reason it exports both the human and bipedal rig but only the bipedal model, even when you want to export the human model and rig.

So for UDK I held the set-up of the idea I mentioned in my previous post. Which was:
Play the animation on the Human form model and rig -> Swap to the Human form model in pose and apply the morph -> Swap the morphed human model in pose to the Bipedal werewolf form model -> Play the animation on the Bipedal werewolf form model and rig. Which results in the video shown below.


As you can see the animation is not as fluid as in Maya, this is mainly because of the simple rig structure and simple skinning I applied on the model. With more practice and greater detail this is problem that should be resolved.

For the upcoming weekend I hope to finally finish writing out the pipeline and explain the structure and set-up of the matinee sequence in Kismet,UDK in greater detail.


maandag 27 mei 2013

Model Animations _ stretching problem and solution

First off I would like to explain why I haven't updated anything over the past week. The reason is because I have been caught up with other project and classes which required my attention. Unfortunately I was unable to work on this project earlier this week. I have managed to work on it over the past the days so here is a quick update.

I continued to test some of the animations on the block-out model of the human form, which I managed to get working in UDK. However I noticed something crucial I overlooked when writing down my initial ideas. Here below is a video showing the animation in maya with the blendshape.


As you can see in the video the animation works, but as the model changes size the rig remains the same. This results in that the position of the joints, where the model should turn its arms is off as to where the joint should be in the arm. The result is that the arms stretch, becoming longer then the arms from the bipedal werewolf form, the model that would be switched into.

This is a problem, that I should have forseen when creating the rigs and models but I simply overlooked. Though I am glad I noticed, since I already formed a solution. This is a simple set-up which I will explain together with a video shown below.


The video above shows the animation on the human form rig. But instead of letting the blenshape occur along the entire lenght of the animation, it now occurs in a certain pose. The idea is to set the character in this pose play the morph and switch the model in UDK, and then let the animation continue on the other rig.
I also posed the bipedal werewolf form and used the posed model as a blendshape target on the human form. You should be able to see the bipedal rig in the video.

This would create a set up like this: Human form model animation -> Pose and morph -> Switch human form model to bipedal werewolf model -> continue animation on bipedal werewolf model.
The length of the animation would not change, the only thing that will be increased is the speed of the blendshape/morph.

It is a simple, but most likely necessary adjustment, of which I hope to show some final result in UDK tomorrow.


vrijdag 17 mei 2013

Character Transformation _ Animation Sheet

Here below you will find the animation sheet for the character transformation. I have added both transformations on the page. The transformation will be controlled by buttons. So first the character will transforms from human form to bipedal werewolf form. And once in the bipedal form transform to the quadruped werewolf form. 


There are however a few poses the will most likely be improved during production. like the starting pose of the second transformation. I might work on the sheet to improve it, but this should give a rough indication of the idea of the animation.

Both animations will be 4 seconds or 96 frames. I hope that over the course of the upcoming weeks I can block out the test models, just to get the feel and as proof for the documentation.

This weekend I will be working on the final set-up for the matinee sequence which I hope to show next week here on the blog.

donderdag 9 mei 2013

Materials transforming together with morphing

The past week I have been working on the materials of the torso/back model(s) and tried to get them working in UDK. The video below shows that the materials are now changing overal on the torso/back model when morphing. 


When you look at the morphing and the materials you might notice that when going from the human torso/back to the bipedal torso/back there is a switch in tone of color, going darker. This is due to the fact that I did not add the same material nodes on the specular material of the model.

I will implement this later when I will set-up, the entire 'final' matinee sequence in kismet, UDK. Which will also give the opportunity to transform back.
Additional features that would be nice to have, would be control as to how the fur grows since now it just blends on the entire model.
And perhaps fur patch geometry that would grow out on the back/ neck area to make the model look more full of fur.

For the upcoming time I will be working on the animation sheet(s) for the animation of character during the transformation and setting up the 'final' sequence. Plus check more in the additional features.

zondag 5 mei 2013

Quadruped Werewolf Form Character Sheet


So last weekend I finished the character sheet and a concept sketch for the quadruped werewolf form. The head, tail, feet and hands will transform further, gaining length and changing shape in comparison with the bipedal werewolf form.


I hope that in the upcoming week I can work on the material transformation in UDK and update it here. 


dinsdag 30 april 2013

Bipedal Werewolf Form Character Sheet

I managed to finish a character sheet for the bipedal werewolf form, and a new concept drawing. I noticed just now that the back side of the werewolf on the character sheet might be slightly bigger then the front side. But atleast I hope it does show the character design.

Like mentioned in one of my first posts I based the bipedal werewolf on the werewolf from the VanHelsing and The Wolfman movies. I do hope you are still able to see the humanoid like face since I still want to capture that in this form, making it look like and in between form before the quadruped form.


Also this werewolf version show the ripped jeans. And I seem to have gotten lazy with the hands on the concept art sketch. Again later for documentation I will have to scan in all the drawings.

maandag 29 april 2013

Sculpted meshes and textures

After a long weekend time out I gave sculpting in Zbrush a try, again. But yet again I was blocked by the shear amount of options given by the program. And also the fact that I wanted to finish atleast some sort of material before the end of the day, that I went back to Adobe Mudbox. 

I created a few simple sculpts and materials for the Human, Bipedal and Quadruped Torso/Back meshes. Which I hope can use through this week to test the materials and see how I will be able to blend them in UDK.

 
Human form

 
Bipedal werewolf form

 
Quadruped werewolf form

As you can see above, the texture streching seems far less obvious then I first expected. However these Torso/Back meshes are change far less then for instance the head, hands and feet.
These meshes make use of one and the same UV-set from the human form, which I then reshaped into the bipedal and quadruped form.


The mesh it self is only 560 faces, 1120 tris.

I also created new UV-sets for the bipedal and quadruped meshes, yet I still have to create the textures for those.

I will have to test both, the same and different UV-set meshes in the matinee sequence.
In the result I hope to see if it possible to swap the models with their different UV-sets and still create the blending transformation for the fur on the models. Like mentioned above I will continue to work on this over the course of this week.

woensdag 24 april 2013

Human Form Character Sheet

I managed to finish a character sheet for the human form, and a concept drawing. The character will be based of the actor David Witts. Don't got a paticular reason for the actor choice but I think he looks fitting.


I know the previous werewolf concept sketches do not show any ripped jeans, but I gave it a thought and I think it might be more appropriate. So for the upcoming bipedal and quadruped form character sheets I will draw the ripped jeans. Since these designs will be final for the character design.

Of course later for documentation I will have to scan in all the drawings, because right now I do not manage to make them look good when making a quick photo of the sketch and adjusting that photo in photoshop. I hope I can do this in a week or two while finishing the other character sheets, and then I will update the old post with better images.

zondag 21 april 2013

Morphing in UDK 03

I managed to set up a simple matinee sequence in UDK's Kistmet, thanks to an example from here. The one who post the thread was generous enough to also add the UDK and UPK files.

The result of the morphing can be seen in the video below.


The sequence gives me the possibility to transform/morph on the press of a button. When you press 'E' it transforms from the human form to the bipedal werewolf form and when you press 'Q' it transforms from the bipedal werewolf form to the quadruped werewolf form.

In the animation you can also see spikes, these spikes on the models while transforming are most likely the result of the model not being skinned properly to the rig.

In the video you can see the spikes disappear on the model, this is because I set up the matinee sequence so it switches the models.


This is how the sequence has been set in Kismet. It is also possible to create a reverse, however I believe that I would like to create a different animation for transforming back then simply using the animations in reverse. These animations will have to be drawn out as animation sheets.

The reason why I switch the transformed mesh with a the full mesh, like the transformed bipedal form with the full mesh of the bipedal form is because otherwise the morph target from bipedal to quadruped form will not work properly. This is an issue I mentioned 'Morphing in UDK 02'.

But it also has two more advantages, one is it immediately replaces the skeleton/rig structure of the mesh. The skeleton which later on will have a different set of animations.

The second is that it could decrease the problem of having to cope with streched UV's around the feet, head and hands on the transformed mesh. The streched UV's will occur due to the blend shape/ morph target not changing the UV's of the model.

I'm not sure if it can solve the problem, perhaps if I would switch the meshes halfway during the animation, on the two seconds instead of on the fourth second. But this would require another blend shape/morph target. One from human to bipedal, where as the bipedal is the blend shape target and one from bipedal to human where as the human is blend shape target.
But also require setting up the materials in the right way. This is certainly an issue that requires testing.
I hope I can cover this in the upcoming week with the torso/back mesh.


woensdag 17 april 2013

(Pre-) starting sculpt mesh and material test

The past week I have mainly been researching a few things. One thing was materials in UDK, which I hope I can begin working on soon once I have finished sculpting the torso/back model.

The other thing I checked is Z-brush sculpting and creating a more detailed torso/back model. Here below you can see the result and it seems to work with the blend shape I created, this was merely a quick test.


UV's do not seem to change with the blend shape, so I will have to watch out for stretching.
___

This week I also worked on the creation of the bipedal and quadruped werewolf form skeletons/rigs.


I hope that over the course of the upcoming week I can set up the transformation in Kismet, UDK. So the transformation/morphing works with the proper animtree and matinee set-up.
___

I also tried to find a solution for the vertex order problem in maya which can majorly screw up your blend shapes. Maya reorders the vertices of the model when you split and merge your model, add an edge even adding a vertex is to risky.

Unfortunatly I have not managed to find any solid scripts or plug-ins that can fix this problem. I did find something about a plug-in called Maya Mesh Re-order, but it seems the one who initially put it online took it off again due to certain problems and it wouldn't work on geometry that would look really different from one and the other.

The only things that might work is using the program Houdini SideFX to remap the vertices of your model, or simply not adjust your model once the Human base mesh has been created.

I think that I will keep it to the latter, and make sure to make this an critical note in the pipeline.
___

So in the next week I will be working on the torso/back mesh and create a blending/transforming material in UDK, possibly with fur patches of geometry.

And work on the real-time transformation to set up the right matinee sequence in Kismmet.

maandag 8 april 2013

Morphing in UDK 02

The past day I have worked to get the entire mesh into UDK and test the in-between blend shape deformation which I applied in Maya. I mentioned the in-between function of the blend shapes in "Block-Out Quadruped Werewolf Form".

Unfortunately I have come to a few conclusions which I will sum up:
* Wrap Deformer cannot be exported as FBX, FBX does no support this function
* A combined mesh from separate body parts (head, neck, torse, ect.) with blend shapes cannot be exported properly. This creates ‘mismatched morph target geometry’ in the exported file and breaks the blend shapes.

* Animations made on skeleton/rig which is skinned to the mesh does work with the blend shapes. Skinning is important as when done not appropriately it can break the mesh in the blend shape.

* A mesh consisting out of separate body parts skinned to a skeleton/rig gets combined in UDK into one Skeletal Mesh.
* Multiple blend shapes on one mesh get grouped into one ‘Morph Target’, the morphs/deformations are still selectable and get the name of the mesh with the title ‘Shape’. Example ‘BipedalWerewolfForm01_RightArmShape’.
This means that each body part getting its own morph, and when you have a lot of morphs the overview will become cluttered.
* An In-Between blend shape deformation applied in Maya does NOT work in UDK. UDK does not apply it, instead it increases the weight of the morph. So morphing from human form to bipedal werewolf form works, but then applying the third morph going to the quadruped werewolf form breaks the final result. See ‘UDK_FBS_Test02’ video which you can see below.


(The video below are the correct final morphed meshes. Do keep in mind that the morphing order is wrong. 
The human form transforms to the quadruped form, this should go from bipedal to quadruped)


The conclusions above basicly mean that most of the fixes that I mentioned in earlier notes, do not work in UDK. Wrapping, combining body parts and in-between blend shape deformations.
This means I will have to apply a different approach, which I have taken into account.


Concluding from the separate findings above I will describe the basic solution. Create a full body mesh which does not require any separate body parts, except for the ears, tail, teeth and tongue. This will minimize the amount of morph targets you will have to work with in UDK and create a more pleasant overview.

Begin creating the human form mesh. From this human form mesh you will create the bipedal werewolf form mesh and from the bipedal werewolf form mesh you will create the quadruped werewolf form mesh.

Apply the blend shape deformation on the human form mesh with the bipedal werewolf form mesh.
Keep a separate bipedal werewolf form mesh on which you will apply a different blend shape deformation with the quadruped werewolf form mesh.
Make sure you do this also with the separate ears, tail, teeth and tongue parts.

Create the skeletons/rigs for the for all three forms, skin this and test it with the blend shapes in Maya to see if it does not break. Animate the transformations. Export the human to bipedal form and bipedal to quadruped form separately to a FBX format.

This should give a result in which the body changes size and the topology of the character gets adjusted.

-

The next step that I will research and test is the changing of the skin, or blending of the materials in UDK.
I will also try and see test the result of fur patches as planes growing out. Trying to get a nice blend with the transformations.

While I test this I will also continue to work and test my 'basic solution' creating solid meshes of the current block -outs, build out the rigs and create a simple animation for the transformation.


vrijdag 5 april 2013

Animations and Morphing in UDK

So after some trouble I managed to get the blend shapes working with a simple animation in UDK. One of the main things to remember, when you wish to import a skeletal mesh into UDK. Is that your mesh must have at least one bone/joint, skinned to this mesh. It doesn't require any animation but otherwise the engine will not register it as a skeletal mesh or import its blend shapes.

In UDK blend shapes are mentioned as Morph Targets. Unfortunately it is not as simple as to just combine morph targets and animations to one mesh. It requires a little more delicacy and detail, especially the naming, the type of mesh you set into the scene and the nodes you have to use to make it all work together.

Luckily I managed to find some information and combine it to figure out how to properly structurize the animtree and set it up in kismet and matinee. 


It might not look all that complicated, but forgetting to move one slider can already break it. UDK seems very sensitive about that.
Here below you can see a short video of the result, the animation and morphing is playing real-time.


I noticed that in Maya and UDK the morph can still occur on the skeletal structure on the mesh while it is animated. This way you can create an animation while the character is morphing.

Also UDK seems to use the same envelope from 0 to 1 like in Maya which means that it is possible to add an in-between blend shape. I will however need to test if it works.

I will check if it is possible to also morph the rig in maya, however I believe it might be easier and overal less time consuming within a pipeline to create the bipedal and quadruped rig set and swap them in UDK after the morphing animation has finished.
This way you can also create seperate, walk, run, jump and other animations on those different rig sets. Instead of having a lot of different animations on one rig, it seems to me to be more organised. 

Next will be to see if I can make the human form block-out work with all morph targets within UDK.


donderdag 4 april 2013

Block-Out Quadruped Werewolf Form


So I have continued my work on the block-out meshes. Creating solid versions of the block-outs I had and creating the block out for the third form, the quadruped werewolf.

As you can see in the images below it is based on the sketch version I posted last week. The form might not look much different from the bipedal form at first, but it is definitely longer, thinner and slightly more lean.


I also applied the blend shapes with an in-between to the human form block-out, placing the quadruped werewolf form in a T-position.

Now it is possible to blend from the human, to the bipedal and then to the quadruped werewolf form, as you can see in the video below.


While setting it up the blend shape I again ran into the problem of the deformation of a few pieces getting screwed up. Like I explained in the previous post it could be because of the vertex order. 

Luckily I was able to apply the solution of duplicating the piece like for example the neck from the human form. Adjust the vertices to the position of the neck for the bipedal form and renaming the body piece. This solved the problem of the mesh breaking in the blend shape deformation.

So now there a human form that has the ability to change shape into two other forms by the use of blend shapes. The past week I also researched on the subject as to how to make the blend shape with an animation work in UDK. I hope I can update this tomorrow and show the actual result.

woensdag 3 april 2013

Morphing in Giana Sisters: Twisted Dreams

Giana Sisters: Twisted Dreams is a game developed by an indie developer called
Black Forest Games.
The game shows some interesting asset morphing since it transforms the entire level in two or three seconds.

http://www.youtube.com/watch?v=kzZ-xxx8_30&feature=player_embedded

http://www.youtube.com/watch?v=V-UBunMYik0&feature=player_embedded

Here they explain a bit about the process of the game. However I would have loved a more detailed description it does give an explanation as to my previous problem when I tried to blend shape the whole model and the model broke. It gave a similar result in the video below.

http://www.youtube.com/watch?v=GGR_PB5r-is&feature=player_embedded

The reason is the vertex order of the model, it seems that it can change when it is being duplicated, adjusted in position or when it combines. I am not sure how you can check the order or if it is possible to change it.
The problem also seem to arise for people who use a 3D sculpting program and go from Zbrush to Maya or Max, adjust some stuff and go back.

I did find a solution for this problem with blend shapes and that is to duplicate the starting model en snap the vertices to the transformed model piece. This is however a very time consuming and tedious solution.

woensdag 27 maart 2013

Wrap Deformer and Blend Shapes on a solid mesh in Maya

So since the last Blend Shape tests on the block-out models I have been working on the solution to get the Blend Shape deformations from each seperate body piece to one solid mesh.

After some researching I managed to come accros a thing in maya called a wrap deformer. Which I started to test around with. It seems that you can combine the seperate body piece from the human form block-out and keep the blend shapes that have been applied to them. This makes it possible to apply a wrap deformer if you still have the first solid mesh.

-

I tested this wrap deformation out on a combination of four pieces, the head, ears, neck and torso. It did mean I had to rework the block -out pieces in a way that made sure the vertices where ones connected.

The result can be seen below.


Like with the blend shape test it gave me the possibility to deform the mesh from human to bipedal werewolf form. But the wrap deformation also gave me the possibility to adjust the whole mesh keeping the mesh on solid object. This can be seen below.


The wrap deformer seems to be a great succes to create blend shape deformation in maya on seperate pieces and making sure they apply on the solid mesh. It basically means you can create a blend shape based transformation in maya on a whole character model.
I can image that it is definitely possible for a low poly character to have a real-time character transformation.

However the question still remains if it can be used in UDK and this is what I will test later this week.


maandag 25 maart 2013

Quadruped Werewolf Sketched

Some first idea sketches on the quadruped werewolf form. I think I will consider to keep the paws with thumb instead of morphing them upwards, as you would normally see with wolves.

The quadruped form will also be a little more buff then a wolf. In contrast to the bipedal form it will have larger ears and a larger tail.


woensdag 20 maart 2013

LipService

This subject might not be really relevant to my project, but I wanted to share something which looks pretty awesome. A class mate linked it to me.

An Autodesk Maya plug-in , called LipService. It is a friendly and intuitively organized, powerful multi-resolution subdivision surface sculpting, rigging, paint and animation system. Just check the video!


Perhaps it is a little pricey but I can imagine that for the CGI in movies and game trailers, this can be pretty helpfull. 

dinsdag 19 maart 2013

First Blend Shape Tests


The past days I have done some testing with blend shapes on the block-out models.

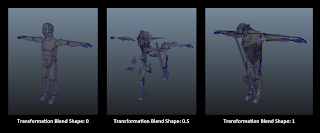
The first test was to see if it is possible to do the entire blend shape on one complete mesh. Now below you can see the result.

Blend Shape Test 01

The blend shape runs from 0 (human form) to 1 ( bipedal werewolf form). You can see how it totally seems to distort from the original block-out mesh which was used for the bipedal werewolf form. 

I am not entirely sure why this happens, at first I thought it was because it was taking the vertices that would make the shortest distance between the human form and those on the bipedal form.
But that doesn’t seem to be the reason because it takes random vertices from the bottom of the feet from human form and drags it to the muzzle of the bipedal form.

-

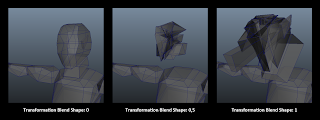
So after my first test I decided to split the mesh up in different pieces. Starting with the head, which included the ears and the neck blocks.  In the image below you can see the result. 

Blend Shape Test 02

Again it seems to just randomly change the vertices around from blocks that are not supposed to become the final shape, it seems to result in the same problem as the first test.

-

In the third test I decided to split up to smaller parts. And I got the result that I was looking for. I added a video to show that the blend shapes are working on each different body part.

                                                        Blend Shape Test 03

It is now existing out of nine different pieces, the head, ears, neck, torso, left arm, right arm, left leg, right leg and tail.

For all three tests I used freeze transformations, deleted history on the mesh and put the pivot in the centre of the scene. Before applying the actual blend shape on the mesh.

Now I am not sure why the blend shapes in the first two tests distorted that much. But I guess it might have something to do with the meshes having intersecting model, like the hears put inside the human form head. Or simply the fact that it is not one closed model.

-

The result however about separating the pieces can be an advantage because it could give the animator more control when animating the transformation. Plus I looked up the possibility to put it on a solid mesh and it is possible to project these blend shapes from the different pieces to the final mesh.

Yet this is still a thing I will have to test if I can get it to work.
And of course I need to test if it is possible to add the blend shape for the third quadruped form.

So the result from the third test could be implemented into the pipeline to build a transformation animation.

Next:
- The first thing I will attempt next is to get the nine blend shapes onto one solid human form mesh and see if I can get these blend shapes to work in UDK.

- Then the rig structure will have to be tested and see if this can also be blended/ transformed.