The past
days I have done some testing with blend shapes on the block-out models.
The first test was to see if it is possible to do the entire blend shape on one
complete mesh. Now below you can see the result.
 |
| Blend Shape Test 01 |
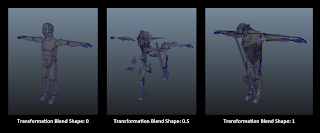
The blend
shape runs from 0 (human form) to 1 ( bipedal werewolf form). You can see how
it totally seems to distort from the original block-out mesh which was used for
the bipedal werewolf form.
I am not entirely sure why this happens, at first I thought it was because it
was taking the vertices that would make the shortest distance between the human
form and those on the bipedal form.
But that doesn’t seem to be the reason because it takes random vertices from
the bottom of the feet from human form and drags it to the muzzle of the
bipedal form.
-
So after my
first test I decided to split the mesh up in different pieces. Starting with
the head, which included the ears and the neck blocks. In the image below you can see the result.
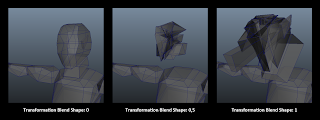 |
| Blend Shape Test 02 |
Again it seems to just randomly change the vertices around from blocks that are
not supposed to become the final shape, it seems to result in the same problem
as the first test.
-
In the
third test I decided to split up to smaller parts. And I got the result that I
was looking for. I added a video to show that the blend shapes are working on
each different body part.
Blend Shape Test 03
It is now existing
out of nine different pieces, the head, ears, neck, torso, left arm, right arm,
left leg, right leg and tail.
For all three tests I used freeze transformations, deleted history on the mesh
and put the pivot in the centre of the scene. Before applying the actual blend
shape on the mesh.
Now I am
not sure why the blend shapes in the first two tests distorted that much. But I
guess it might have something to do with the meshes having intersecting model,
like the hears put inside the human form head. Or simply the fact that it is
not one closed model.
-
The result however about separating the pieces can be an advantage because it could
give the animator more control when animating the transformation. Plus I looked
up the possibility to put it on a solid mesh and it is possible to project
these blend shapes from the different pieces to the final mesh.
Yet this is
still a thing I will have to test if I can get it to work.
And of course I need to test if it is possible to add the blend shape for the
third quadruped form.
So the
result from the third test could be implemented into the pipeline to build a
transformation animation.
Next:
- The first
thing I will attempt next is to get the nine blend shapes onto one solid human
form mesh and see if I can get these blend shapes to work in UDK.
- Then the
rig structure will have to be tested and see if this can also be blended/
transformed.


