The results from the tests and research done
during this period have lead to a final set
up and a supposition as to how to best approach the creation pipeline for the
production stage. This will be given in a short recap here below.
The first step is to model the human form
character mesh in Maya. From this mesh create the bipedal and quadruped forms without
changing the topology, by adding edges or vertices. This way the vertex order
is not affected.
When the meshes are created test if the blend
shapes are working for each model before initialize the sculpting phase. Also add
additional meshes like tail, teeth, eyes, fur patch geometry and claws and make
sure they are placed correctly so they do not create holes later on in the
animation phase. Then sculpt each of the three forms in either Zbrush or
Mudbox.
Once sculpting is done create the separate UV
layouts for all three character meshes. Make sure that the UV’s for each
character mesh is laid out on top of one another. Paint the textures and bake
the normal maps from the sculpted models. Bake additional normal maps from the
target meshes on the main meshes. This is the bipedal werewolf form baked on
the UV layout of the human form and the quadruped werewolf form baked on the UV
layout of the bipedal werewolf form. When baking these normal maps make sure
that the main mesh has fully blended into the target mesh form.
The next step is to build out the rig
structures for all three character meshes, with additional helpers for
animation. Before skinning do delete the blend shapes that have been applied
earlier. The blend shapes will be re applied in a later stage. Then skin each
model to each rig and test the skin in UDK to see if it works. Create the
animations for each character model.
To make the morph target, a posed model of the
main mesh and a posed model of the target mesh need to be duplicated and a
blend shape needs to be applied to these meshes. Once the blend shape is
applied skin the duplicate of the main mesh in pose to the main mesh rig, a
simple smooth bind in Maya should suffice.
Prepare the Root
joint hierarchy and the models for exporting in UDK. Make sure to select the
character mesh and all additional meshes with the root joint to export it in
FBX with the checkboxes checked like below.


Pipeline UDK:

The next step is to import the FBX into UDK.
Make sure the imported file is a Skeletal Mesh. Also check on the checkboxes
for ‘Import Morph Targets’ and ‘Import Animation’ under the tab Skeletal Mesh.
While importing one can place the models in a
certain package, define it in a certain group and even change the name for the
model.
Keep in mind that UDK will make one mesh out of
multiple meshes when importing. When everything is done right one should have
an AnimSet, a Morph Target and one Skeletal Mesh in your designated package.
Once everything has been imported check if the
animation and morph targets work properly on the character meshes within the AnimSet.
The next step is to create the Material set up
for the texture blending. This
is done together with the Scalar Parameter Node, the Fresnel Node and the Add
& Multiply Nodes. Make sure to use the baked normal map of the target mesh
for the texture blending.


1.) Colour map Human Form: The diffuse texture map from the human form character mesh.
2.) Fresnel Node: A node which can replicate rim light on a texture, in this set up the Fresnel is used to make the transition of the blending possible.
3.) Vector Parameter Node: A node to add additional colour to the emissive map and blending of the Fresnel. To make the transition in colour look more natural when blending
4.) Emissive map Human Form: Emissive map. It can also be a different gray-scale map, which is used as an underlay for the colour map of the bipedal werewolf form.
5.) Colour map Bipedal Werewolf Form: The diffuse texture map from the bipedal werewolf form character mesh.
6.) OneMinus Node: A node used to show the visibility of the Scalar Parameter Node and give the 0 to 1 control for Kismet.
7.) Scalar Parameter Node: The node that links to the controller in Kismet to animate the blending.
The textures for the additional meshes on the
characters will either be added in the Materials for the character meshes or
given their own Material(s) with the same texture blending node set up.
The result of this material set up gives one
the opportunity to animate the texture blending in Kismet. The image below shows a small
breakdown of a matinee sequence used within the main sequence in Kismet.

1.) Vector
Material Parameter Track: A track to animate materials. To add key frames press
enter on the timeline.
2.) The
Target Material: This is the Material for the track to use.
3.) Parameter
Name: The name of the controller in the Material. This is the name given to the
Scalar Parameter Node in the Material
4.) Track
Values: These are the track values from the Vector Material Parameter Track.
Setting these on zero and one on key frames in the animation bar makes the
blending work.
___
Once all the materials, for all three character
meshes have been created they have to be added to the character in each
character AnimSet. It is also possible to add the Materials to the skeletal
meshes later on once they have been placed in the scene.
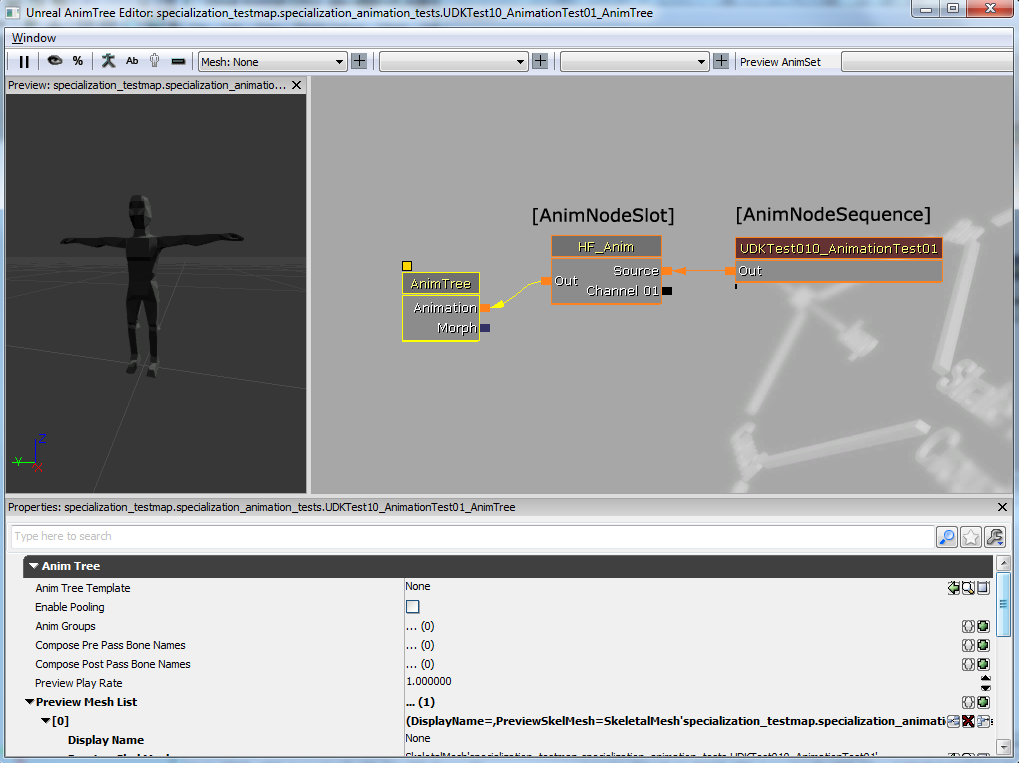

Next up are the AnimTree’s, five in total will
be created. Three AnimTree’s containing the animations for each character mesh;
human form, bipedal werewolf form & quadruped werewolf form.
And two AnimTree’s containing the morph targets
from human to bipedal werewolf form and from bipedal to quadruped werewolf
form.
After these AnimTree’s have been create the
scene can be set up. One needs to place five SkeletalMeshes as Actors in the
scene. One human form SkeletalMeshActor, one bipedal werewolf form and one
quadruped werewolf form. These SkeletalMeshActors will play the animations of
the character mesh.
The other two are SkeletalMeshMATActors, one
human form in pose and one bipedal werewolf form in pose. These Actors will
play the Morph Targets.

Make sure to add all the AnimSets, AnimTrees
and MorphSets to the right actor. This is done by right clicking on the mesh
and opening its properties.
To make all the animations and transformations
work, all the timers and sequences need to be set in UDK Kismet. Create three matinee sequences each containing
skeletal groups for each character mesh. These Skeletal Groups will contain the
animations, texture blending and morph targets.


1.) Morph Weight: A track to animate morph targets. To add key frames press enter on the timeline.
2.) Morph
Node Name: This is the Morph for the track to use. This is the name given on
the MorphNodeWeight in the AnimTree.
1.) Morph
Weight Track Values: These are the track values from the Morph Weight Track.
Setting these on zero and one on key frames in the animation bar makes the morph
work.
3.) Anim
Control Track: A track to animate AnimSet animations. To add key frames press
enter on the timeline.
4.) Anim
Control Slot Name: This is the Animation for the track to use. This is the name
given on the AnimNodeSlot in the AnimTree.
2.) Anim
Control Track Values: These are the track values from the Anim Control Track.
Setting these on zero and one on key frames in the animation bar makes the morph
work.

Once these are set the nodes in Kismet need to
be added and connected. Set Key/ Button Pressed nodes to make the animation and
morph play when a certain key is pressed. And add Toggle Hidden nodes to hide
and unhide certain models at certain times. Make the connections, test the
sequence and the real-time transformation animation should work.